
Wednesday, April 27, 2011
Sewing Tip
Monday, April 25, 2011
Salvaged Pallets


 After the first pallet or so Photo Dude really got the whole process down to a science. He is going to explain his technique just in case you haven't done this before. We really only damaged a few boards and those can still be used for the smaller pieces we'll probably need for something anyway.
So after the trial and error period I got this down pretty good.
 If you are planning on doing this I hope to save you some time getting it down. You want to start by removing the bottom slats.
This is the side with the fewest boards. Prop the pallet up on some other wood so there is nothing touching the wood to be removed. Using a small sledge hammer, I was using a 3 lb dead-blow, strike the slats next to the main crossbars starting on the outside of the pallet. Next step just flip it over and do the same thing with the top. once all the slats are removed it is time to pass th
 em on to my lovely wife to pound the nails out. I did help once I got them apart. It is best if you have them to do this on some saw horses if you have them. It just saves some time and is a little easier on the back. I know this sounds like common sense but I did not get it figured out until half way through for some odd reason. I would recommend finding a mattress store and check with them for pallets. they are sturdy and have long pieces. Last not I would strongly suggest safety glasses for whoever is tearing the pallets apart.
 All together we salvaged 12 2X4 that are six feet six inches and 36 1X4 that are six feet one inches along with a few smaller pieces.
EDIT* We actually got
(4) 62" 2X4
(12) 78" 2X4
(11) 82" 1X4
(23) 86" 1X4
We estimate that it would have cost us around $100 topurchase that much wood new.


Wednesday, April 20, 2011
Homestead Revival Giveaway
One of my favorite blogs is Homestead Revival and they are doing a fantastic giveaway for a book series from Homemade Living by Ashley English. If you haven't ever seen these books they are wonderful even my eight year old daughter loves to read them.
The series includes 4 books she has written: Keeping Bees, Home Dairy,
Canning and Preserving, and Keeping Chickens.

Monday, April 18, 2011
Finally Starting the Seeds


 At least last night we finally got our seeds started. Here in Mid-Michigan it is pretty much impossible to say that frost is over until Memorial day. Molly is learning about measurements at school so she read the backs of the seed packets and got the ruler out to make sure everything was planted at the right depth. We really enjoyed the time together. You can't really see it but there is a grid paper with a map of the garden beds on the table so that we knew how many of each seed to plant. Each of the seed packets got a number and we wrote them in the garden journal with what each number means so that when it is time to transplant we will know where everything should go (hopefully). I can't wait for the next few weeks to pass so that we can get these babies in the ground for real. And no more snow darn it!
Tuesday, April 12, 2011
Moving, and a poor man's cake
Well, I am sorry to say I haven't blogged nearly as much as I would have liked to, but living in a dorm room without a kitchen leaves much to be desired in the way of cooking, most of my meals, when I do cook, are bland and uninteresting. But once in a while I do get a chance to get the dorm kitchen and whip up something yummy. I apologize a head of time, I didn't get any pictures of this, but I wanted to share with you a recipe (simple I must say and not really a recipe) that my grandma down in Arkansas would make every once in a while and was always a favorite of mine growing up. She called it poor man's cake, most recipes I find with this name is nothing like my grandma used to make. But I will share it with you here.
1. yellow cake mix (you can make it from scratch but my grandma always used a box mix and so do I specially at school)
1-2 cans of sweetened condensed milk
optional: you can add in dried fruit or nuts to the cake mix specially if you want to make this for like a tea cake or coffee cake
make your cake or follow the directions and ingredients on the box. Once the cake is out of the oven Do Not Let It Cool it won't turn out the same, I guess you could let it cool but you will need to heat the condensed milk in a pan or microwave to get the right consistency. Poke holes into the cake, use whatever, I used the bottom of a wooden mixing spoon you can make them big or small, this isn't a pretty cake so don't worry about making it uniform. Pour over the condensed milk Only one can for the cake the second can is for if you perhaps desire more. Make sure you fill the holes so the cake can soak up the milk. If you wanted you could cover this cake in a whip cream frosting to make it pretty, however, I suggest if you do so, to not use sugar in the whipped cream, this cake is intensely sweet and heavy so keep the cream light and you will not want the added sweetness, you could make it a citrus cream to break up the sweet but not sure how it will taste if you try it let me know.
In other news! My boyfriend, (Mark) and I have gotten an apartment and will be moving in, in a couple of weeks. It's very exciting and I will have my own kitchen! And I will be able to garden so hopefully there will be more stuff for me to post about once I get settled in. That's really all there is for now, just wanted to stop by share a recipe and the news and I hope I will be around this blog more often instead of just trolling.
Happy Cooking!
Alisha
Monday, April 11, 2011
Sunday's Epic Fail

 We have wanted to try and make hard cheeses for a while but haven't been able to get raw milk. It is available but not an affordable choice for us. While trolling around on line I found a website with a very simple cheese recipe that used pasteurized milk! whoo hoo! I found rennet at the local grocery store and thought that this must be good luck right? Not so much unfortunately. We followed the instructions exactly and thought once we got our 'clean break' after adding the rennet that we were in the clear. I mean look at those big curds. But alas that was as good as it got. After that the whole thing went south. I decanted the whey off in hopes to use it for ricotta cheese but even that fell flat! I stared at the pots in my kitchen and was bummed. Jeff reminded me that most of our experiments have worked so we've been pretty lucky. Oh well now to the library to get a book and read up a little more :)
Rain, rain come and play
 Photo Dude and I decided we wanted to try and make a rain barrel last year. Like many projects we never got around to it. I'm glad we hadn't done this sooner since it probably wouldn't have been a whole lot of fun to pack this up for our move last fall. Our barrel came from a sale this guy was having at his house. He had a bunch of these but I'm not sure where he had gotten them from originally.
Most of these photos will have commentary by Photo Dude since he was the one building this. Yet again just a reminder all text in green are the thoughts and comments of Jeff AKA Photo Dude. So as not to make this to techie as I tend to ramble about thread sizes and stuff like that. At the bottom of this post is a link to the you tube video where I got the plans for this project. Same kind of barrel and every thing.

The basic's of what you are seeing in these shots are this. I was making this up and trying to look like I knew what I was doing. Well I kind of did thanks to the video. I drilled the holes in the lid with a stepper drill which gives a pretty clean hole. They are kind of expensive so a spade drill works just as well but I have the others for work so I used it. The Spigot I used is a half inch that is at a 90 degree angle. I would recommend getting one that is at a 45 degree angle because mine is touching the barrel and tends to run down the side. Lesson learned. See I told you I would get techie on you, sorry.
 Drilled the hole for the spigot and If you have this kind of barrel I would listen to the video again before starting your drilling. I did not so it could have been better but it works and I do have plans to improve the water collection system next year. I hope.
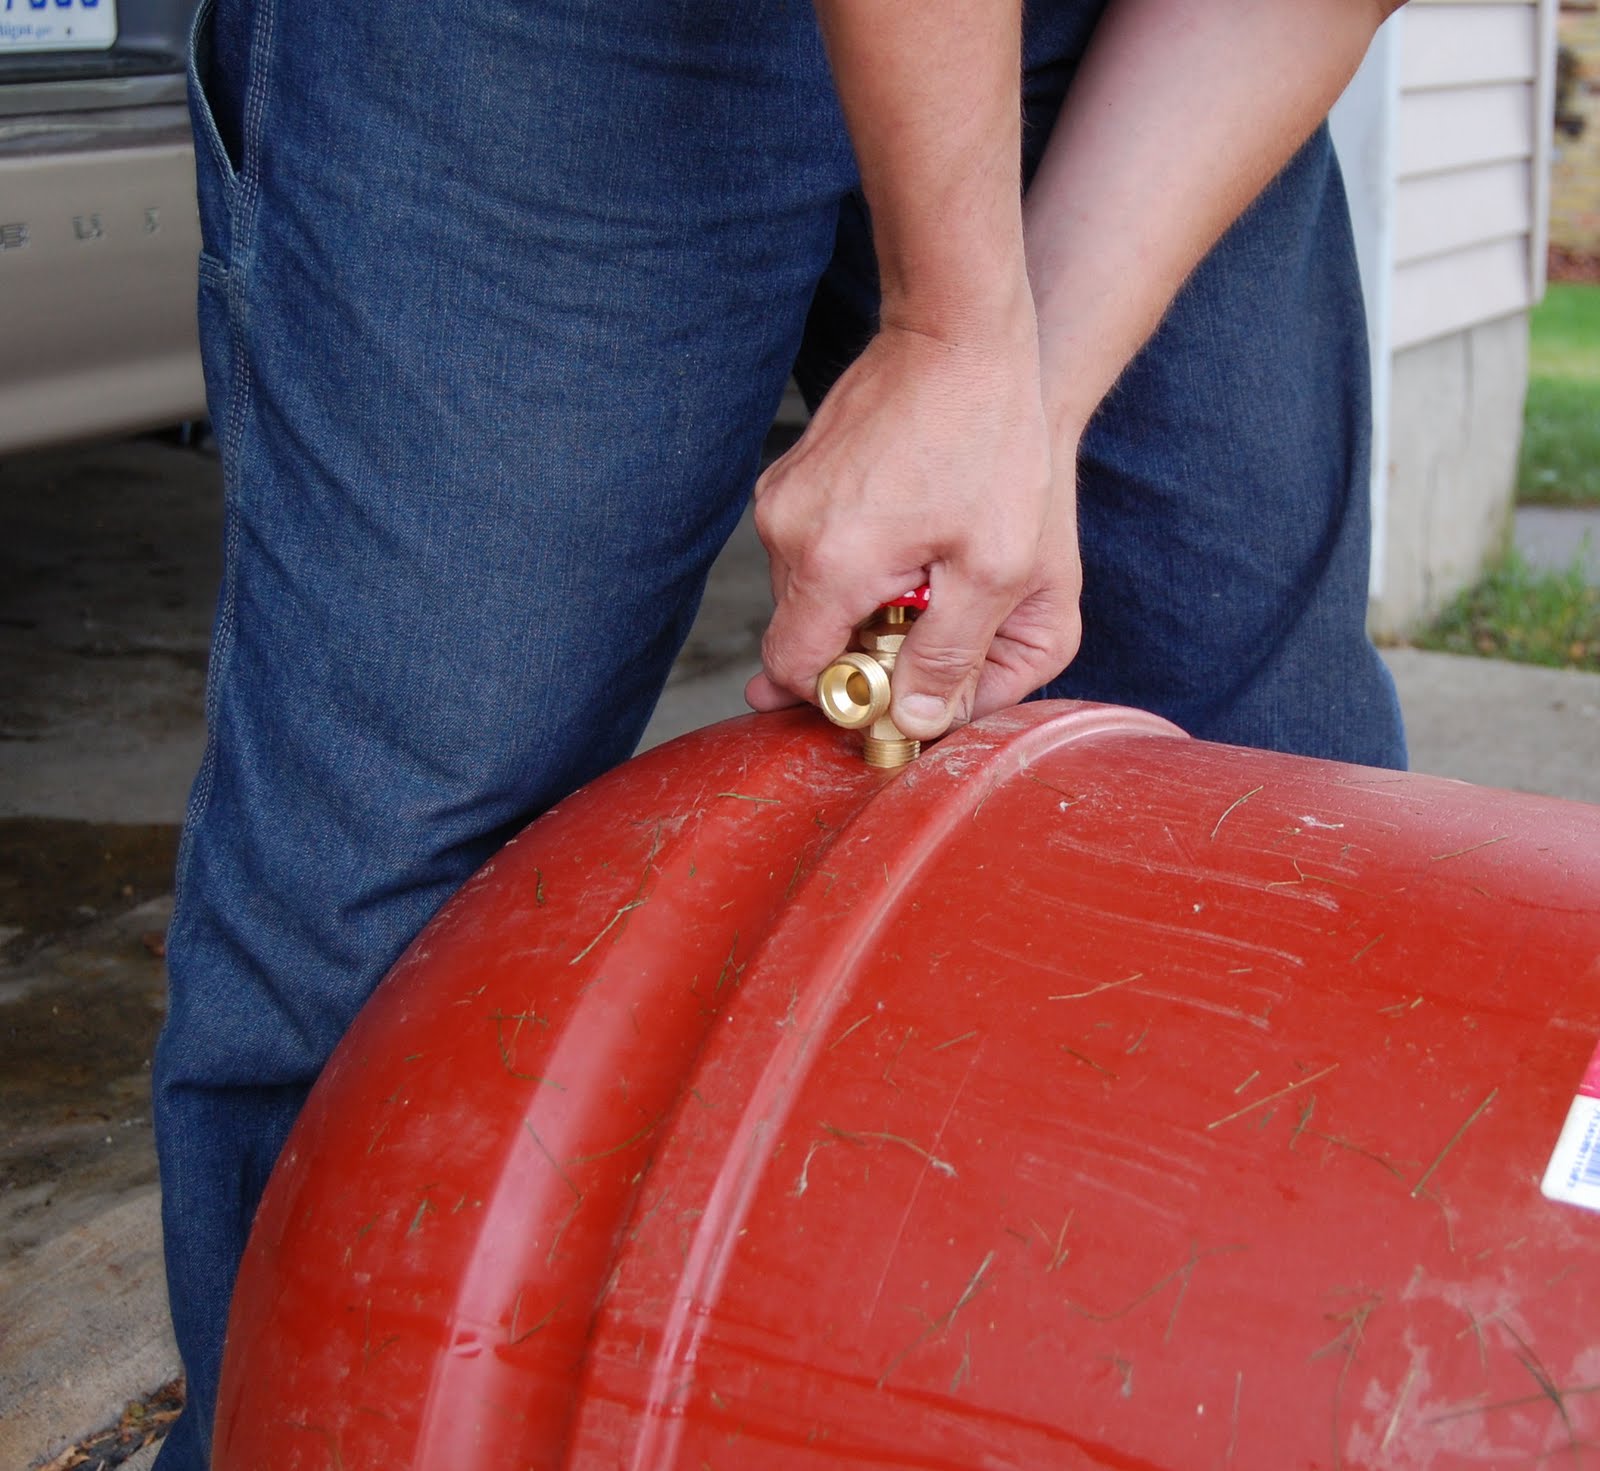 Spigot going in a bit tight but forgot to check the size before drilling. I am a guy so that is just how it works sometimes.
 The next few pictures are of the overflow. Prety basic. Get a 3/4" NPT to garden hose fitting and screw it in. Put a piece of hose on it and wham you have an overflow.
  The next step is the screen. Important for keeping chunks out of you water and bugs. don't forget it needs to go over the top and a piece needs to go over the end of your overflow hose.

 Finished barrel ready to be installed.
 I lost most of the Photos for the install but the short version is cut your down spout to fit and see what comes out of it. I guessed at a lot of this part but it works great.
  The next door neighbor had a bunch of these patio stones in their backyard that were there when they moved in and said we could have them. This added height will make it much easier to fill a watering can from. We pointed the overflow hose down the cement trough so that hopefully we don't end up with a low spot in the yard from where the water comes out. If you don't have gutters on your house and you have that little moat around your house you know what I'm talking about.
If you would like to see a set by step video of how to make this here is one we found on YouTube.
 |
Saturday, April 9, 2011
Mama's New Toy

 Many moons ago Photo Dude and I had a 900 square foot apartment with a 4X6 foot linoleum kitchen floor to clean and a 5X10 foot ceramic tiled bathroom floor to clean. Yes we had more floor space in the bathroom than the kitchen and yes our landlord was a guy. One day out of the blue Photo Dude brought me home a Swiffer Wet Jet, I was ecstatic about it! With two small areas that needed to be washed down it was perfect. Fast forward a bit and we are living in a 890 square foot house with a little more linoleum in the kitchen and laundry room and the bathroom that needed to be scrubbed. The Swiffer was still perfect I thought. Next we move to our fabulous new house with A LOT more hard flooring that needs to be scrubbed. When we moved Photo Dude and I knew that we were tired of all the disposable things in our lives so we got the sponge mop. I hated it immediately for all the reasons that are on the TV commercial. I continued to use the Swiffer until we ran out of juice and batteries. Then we got this! It is the Rubbermaid Revel, you get to add in any cleaning agent that you want to and the scrubbing pad is washable. I would say that the Revel works pretty much the same as the Swiffer but it does spray a bit higher so watch your lower cabinets. I just loved that I wasn't using commercial cleaners or something disposable so I thought I would share my new toy :)
Easy floor cleaning solution
1/2 C. white vinegar
2 C. water
the vinegar smell goes away once it dries.
Thursday, April 7, 2011
Easiest Bread Ever


1 C. Whole Wheat flour
2 C. All-purpose flour or any mix of these two.
(I have yet to get my 50/50 mix to turn out just right but this mix works great)
1 tsp. Salt
2 tsp. Yeast
Fork these dry ingredients together.

2 Tbsp. Oil (light flavored like peanut or vegetable)
1 Tbsp. Honey (doing the oil first keeps the honey from sticking to the measuring spoon)
1 C. Warm water (warm not hot, don't kill the yeast)
 Give the whole thing a quick mix with a wooden spoon and turn out on to your work surface. It sort of looks like a real mess. Knead for about five minutes. Just long enough for everything to get incorporated and the dough to get elastic. Let it rest on the counter while you wash out the bowl. Oil your bowl before placing the dough in. Cover with a lint free towel and let rise for about an hour or until doubled in size.
 Once your dough has risen punch it down and knead for about a minute to make sure the air is all out. While kneading shape it to fit your pan because the dough doesn't really care what shape the pan is. My first loaves were nice and tall but very short on the sides because I didn't shape them very well at all. Let the dough rest after kneading while you grease your loaf pan. I like to use a little vegetable shortening it seems to make the bread release a lot easier than the oil did.

Cover again with your lint free towel and let rise another hour or so. Place in a cold oven at 350 degrees for about 25 minutes. It should sound hollow when tapped. Turn it over onto your kitchen towel and release from the pan. The bottom should sound hollow also, if not than place back in the oven for a few more minutes. I like to let the bread cool over night before cutting.

Wednesday, April 6, 2011

Monday, April 4, 2011
Spring Time Thoughts

After our garden growing beautifully this
summer we realized that the corner of our yard wasn't the best spot for us to try and harvest or even weed the darn thing. And we were pretty limited by the size and expansion possibilities. Photo Dude and I decided that what we needed were raised beds instead of an in ground plot. We hope that the weeding will be possible without worrying so much about the kids breaking stems and if the tomatoes run amok again (please let that happen again) we will be able to get at the vines without trying to do the limbo under the wires run for the cucumbers.
 Our back yard isn't very deep but we have a wonderful side yard that isn't used because I can't see the kids playing from the deck. This is going to be the perfect place for our garden beds and there should be plenty of room for expansion. Photo Dude built three new beds and we have a layout in mind for at least two more. We want to see exactly how much we can fit in each of our boxes this year.
  We've been using "Square Foot Gardening" by Mel Bartholomew as our reference guide for how big things might get. We sort of made a list of the things we eat the most often and decided that was what we would like to grow ourselves if possible. Much to the disappointment of the kids we will not have banana trees or orange trees. That just isn't going to work in mid-Michigan. We also explained that while there are other trees we could grow our yard just isn't right for an orchard and there is such a nice one we get everything from we'll just keep going there.
I will now turn things over to Photo Dude so he can explain the dimensions of the boxes and any tidbits that might come in handy while building your own frames.

So as you can see these are real basic boxes. I am going to till up the ground under them so we have more dirt room for roots. The boxes themselves are 4 feet by 8 feet by 6 inches deep. All I did was take 3 2x6 boards 8 feet long, cut one in half, and using deck screws to screw them together. I was thinking of going 2 high but the cost of soil was a bit much for us right now and I can always expand them later if we find a need to. Make sure when buying screws that you are getting a screw that is made to stand up to the elements not just drywall screws. We will post again about these boxes when we till up the ground and get the dirt in. I have to wait for it to stop all this snowing before I can think about that. Photo Dude

Spinning Yarn From Wool
 I have been meaning to post this for the last 2 weeks but I have been a little busy. So let me tell you about my spinning class. I went to our local yarn store to take a class with a very nice and patient man, Will, who walked me through the spinning processes. I being a little ADD and OCD need to learn with someone walking me step by step. I found it to be pretty easy and fun. Above is the product of my class. I am going to butcher the terms but there are a lot more than I would ever have thought. I took the batting and using the drop spindle turned it into the very small ball of yarn that you see. This yarn is is not ready for use it needs to be treated so it will not unravel when you use it. I will, when I have time be spinning a much larger ball of yarn and finish it off so my lovely wife can knit with it. I really enjoyed myself and can see myself doing this and getting a lot better looking yarn. I will be posting a much more detailed blog with the whole processes. I would encourage anyone who is interested in doing this to find some You Tube videos to learn from. There are a lot to choose from. Watch a few different ones before trying it yourself. If you have a video yourself or find one that you like please post it in the comment section of this post so others and myself can learn from it. Take care and as soon as I can I will post a much longer and more detailed post on this topic. Thanks Jeff A.K.A. Photo Dude.
P.S. I had a thought to link to the yarn shop in our town and found their blog. All the people at this shop are so nice to deal with and they have some very cool classes and products. So check out their Blog here
Subscribe to:
Posts (Atom)