Showing posts with label cooking. Show all posts

Monday, May 13, 2013

Pretty Breakfast


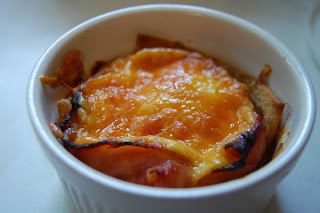
This is what I made for breakfast yesterday morning.  I saw it on the Cooking Channel with Rachel Khoo's 'Little Paris Kitchen'.   They were her take on some sort of French classic dish. 


I didn't follow her recipe exactly because it just seemed like it would be so very simple to do.  This one really is.


I think her recipe had a cheese sauce mine has apple smoked cheddar (oh baby that's good stuff!).


An absolutely gorgeous easy breakfast that even my kids can make and you can choose how many you need to do.

A Pretty Breakfast
adapted from Rachel Khoo 

White bread
Thin Ham slices
Eggs
Shredded Cheese
Melted Butter

Preheat oven to 350 degrees.  Cut the crusts off the bread and use a rolling pin to make them thinner (like a pita bread) brush melted butter on each side of the bread.  Tuck the bread into ramekin dishes or large muffin tins, add ham on top of the bread.  I sort of tucked the ham around the edges so that the center was still totally open.  Crack an egg into the middle of the ham and bread.  Top with cheese of your choice something with a good strong flavor is a great choice.  Bake for 20 to 30 minutes depending on how well done you like your eggs.  Let set for a few minutes after you pull them out of the oven.   
Monday, March 11, 2013

Stuffed Chicken Breasts


One of the first dinners I made after the whole I'm not cooking for anyone thing was a fantastic stuffed chicken breast.  I have never tried to do stuffed anything before and it was a lot of fun to do.


I started by butterflying my chicken breasts I wish that I had a meat mallet to thin out the breasts.  Unfortunately it got lost in a move and I never remember I need to buy a new one until I actually go to use it.    
Put in a smear of spinach pesto and fresh mozzarella balls cut into half in each breast.   Then I coated the breasts in flour, then eggs, and finally panko bread crumbs with Parmesan cheese.


I fried the chicken breasts until each side was beautiful golden brown.  Then we baked them on a rack to make sure they were cooked all the way through.  Keeping them lifted made sure that they didn't get soggy.  The final touches for dinner was a cheesy orzo and sauteed spinach and garlic. 
Hello yummy!!!  Everyone enjoyed dinner that night and begged me to make it again soon.  I think it will become a part of our regular rotation of meals.


 Stuffed Chicken Breasts

4 Chicken Breasts, fresh mozzarella balls (or sliced mozzarella), pesto
3 Eggs
1 C. Flour
1 C. Panko Bread Crumbs mixed with 1/4 C. Parmesan Cheese Grated

Butterfly the chicken breasts so they are uniform on each side.  Inside gets a spread of pesto and mozzarella (keep it away from the edges).  Cover in flour, dip into the eggs and then coat in Panko Bread Crumbs.  Fry until golden on each side.  If the temperature of the meat doesn't come up to 180 degrees bake until  safe.  Enjoy!!!!


Saturday, June 23, 2012

Yogurt Sorbet Stuff

 It has been hot here like really really hot.  I don't mind it hot is way better than cold being cold stinks.  The children and husband do not agree at all.  They have been rather miserable about the heat.
 To help cool off I made this frozen yogurt sorbet stuff.  It was pretty tasty once we added enough honey to it.  We've been making our own yogurt for a while now and that made it much more tart than expected.  Of course when my mom told me about it she was probably thinking about using sweetened vanilla yogurt to start with. 
 The blender did not work like at all.  The food processor did a great job.  Of course by the time I figured it all out the fruit was not so frozen and it was more like a shake than a mug of frozen yogurt. 
 We ran out of bowls this day, they were probably in the dishwasher.  I'm not sure how a family of four can go through bowls so fast.  Oh wait mostly it's because most foods start in a bowl like stir fry and spaghetti and stuff like that, stuff that most families probably eat off of a plate.  Jeff likes bowls better than plates for most foods.
Anyway this worked great for a quick snack for the kids and we'll be making this again I'm sure.

Frozen Yogurt

About a pint of thick yogurt
One small bag of frozen fruit
Honey to taste

Mix in the food processor until desired consistency.  Enjoy :)

Monday, February 27, 2012

All About Oats Today

 Today was all about oats at our house.  Well oats and laundry we always seem to have laundry to do here.  I've been trying really hard to buy fewer and fewer convenience products that I can simply make myself rather simply.  Granola bars are one of those items that my family loves but they are fairly expensive and really not all that good for you if you buy most major brands.  The other problem is that my daughter can't eat most granola bars in her classroom because they contain nuts of some sort.  So I found a recipe for a simple nut free granola on SparkRecipes.com it was very simple to make and oh my gosh delicious.  The only thing I would say is don't be in a total rush to get them out of the pan, cut them in the pan instead of trying to flip it over on to a cutting board.  The pieces were delicious but they aren't as pretty or as uniform as I would have liked.  Guess I need to get a second 9X13 so I don't have to rush to clean the one I have for the next project.  Speaking of which that was also an oat project but that is still cooling in the pan where it belongs so I've got a bit longer before I can share that one. 
 Sooooooo gooood!  I think next time I'm going to try dried cherries and apricots.

Homemade Nut-Free Granola Bars

Submitted by: BLSCT123

Easy to make granola bars that even my picky-eater loved!
Number of Servings: 14

Ingredients


    2 cups rolled oats
    3/4 cup packed brown sugar
    1/2 cup wheat germ
    3/4 teaspoon ground cinnamon
    1 cup all-purpose flour
    3/4 cup raisins (or other dried fruit)
    3/4 teaspoon salt
    1/2 cup honey
    1 egg, beaten
    1/2 cup oil (veggie or canola)
    2 teaspoons vanilla extract


Directions

Preheat oven to 350 degrees F (175 degrees C). Generously grease a 9x13 inch baking pan.

In a large bowl, mix together the oats, brown sugar, wheat germ, cinnamon, flour, raisins (or other dried fruit) and salt. Make a well in the center, and pour in the honey, egg, oil and vanilla. Mix well with wooden spoon or your hands. Pat the mixture evenly into the prepared baking pan.

Bake for 30 to 35 minutes in the preheated oven, until the bars begin to turn golden brown at the edges. Cool for 5 minutes then cut into bars while still warm. DO NOT ALLOW THE BARS TO COOL COMPLETELY BEFORE CUTTING or they will be too hard to cut.

Makes 14 - 2 inch by 4 inch pieces.

Submitted to:


Monday, September 12, 2011

DIY Fruit Leather

 Molly got a new issue of Food Network magazine this weekend.  In it was how to make your own fruit roll ups.  The kids decided that we NEEDED to do that!  We were headed to the farmer's market anyway so we grabbed some extra fruit while we were there.  I read through the Food Network recipe and realized that they used a lot of white sugar, not gonna' happen in my house.  The kids helped me pull out every book that might reference fruit leather and we sort of just did our own thing.  We had a pass/fail thing all at one time so we learned a lot in just one try. 
 We started with three pints of fresh raspberries rinsed off and put into a large pot.  Then we added about half a cup of raw honey, but we just eyeballed that.  Mush it up (this is the kids favorite part).  Cook the berry mush down until it starts to get sticky just like when you make jam. 
While it is cooking set your oven to 200 degrees and place parchment paper on some cookie sheets.  Lightly coat with oil or cooking spray (kinda important but not devastating if you forget).
Pour the sticky mess onto your covered cookie sheet in a nice even layer.  I found this bit tricky but if you have one of those off set frosting knives it is probably a lot easier. 
Bake for four hours and then start checking it as often as you think it needs it.  Like if it's super sticky forget about it for another hour or so. 
If you have two trays remember to check each one!!!  This is the mess that was left after my thinner tray burned it was a tragic mess.  Part way through I checked the bottoms of the sheets and then decided to flip over the leather for more even cooking.  That is were the oil would have been nice but it really wasn't horrible to get the parchment off just a little more time consuming. 
The slightly thicker tray was beautiful nice dark color texture was great everything.  I cut the leather into strips and Jeff wrapped them up in wax paper strips and twisted the ends like candy, very cute right?   
Jack said he loved the leather, Molly didn't like how tart it was.   Next we are going to try plums maybe that will be sweeter for her. 


Friday, September 9, 2011

Snacky Bits

  I'm going to let you in on a secret, I'm not a big snacker.  It drives people crazy that I don't have a ton of snack foods around the house (including the ones living here!).   I don't really think to purchase or make snack foods very often because I'm more of a two square meals a day and coffee for breakfast kinda' gal.  Every once in a while though I will break down and feel like having something snacky and everyone gets happy :) 
This is a super simple Zucchini Hummus that we had after getting home from the county fair a little wind burned and definitely burned out on fried food.  If you have any zucchini hanging on in the garden try this for something to munch on.


Zucchini Hummus
1 can of chickpeas (garbanzo beans whateva')
    save the liquid when you drain them
a generous half cup of diced zucchini
juice from half a lemon
one clove of garlic (or two if you feel spicy)
1 1/2 TBSP Tahini
1/2 tsp salt
1 TBSP Olive Oil
a sprinkling of cumin

Place all ingredients in the food processor and blend until smooth adding the reserved liquid from the chickpeas as necessary.  Enjoy with pita/flat bread crackers or veggies!

Monday, August 1, 2011

Blue Weekend

We had a wonderful weekend!  Our good friend Heidi took the kids and myself blueberry picking for the first time ever.  Her son is Molly's age and all three of the kids get along like siblings (a little fighting a little getting along it all works out).  We picked 9.25 lbs of berries and the kids probably ate a few pounds themselves.  We all got home and cooled off it was a hot day.  Heidi and her son came back to our house and we had blueberry pancakes for dinner and then I got to show her how to make jam!  I love getting to show people things that I love so much.  We made a spiced blueberry jam and a cherry berry jam.  We still have a ton of blueberries left.  Many of them are going to be frozen for future use.  Heidi and I are also thinking of getting out the dehydrator and drying some.  Both of us have dehydrators but neither of us have used them, this might be the perfect opportunity to do so. 
I'm linking this post up the the Homestead Revival: Barn Hop #22 just click on the link below and and see what everyone has going on.
 

Sunday, July 17, 2011

Homemade Lemonade

Last weekend we had a family BBQ.  It was wonderful :)  I had very much wanted to be over the top and do everything from scratch but the heat and time made me step back and only do a few of my intended projects.  One thing I did get to do was make fresh from scratch Strawberry Lemonade.  I followed the recipe from the Ball Canning book.  It was delicious!  On the tart side instead of the too sweet side and we found out that it was extra delicious when mixed 50/50 with unsweetened sun tea.  The recipe for this lemonade is on page 192 in the Ball Complete Book of Home Preserving

Sunday, May 15, 2011

Jalapeno Poppers The Mans Way

OK so you are probably wondering what is up with the title. Well I (Jeff a.k.a. Photo Dude) made poppers for my lovely wife tonight. This is something I have never done before and kind of made up on the fly, as a guy may do from time to time. They worked out but I did some things that would have been easier if I would have looked for directions. So here we go from start to finish.

I started by cutting the tops off the peppers and then cleaning them out so I fill them. In hind site I should have cut them in half before cleaning them out. They cook better and are easier to work with. I ended up making some of them that way to.
The filling is real basic, cooked up some bacon, chopped it up. I added half a block of cream cheese, about a cup of graded cheddar cheese and the bacon. I had to warm up the cream cheese a bit to make it easier but that is it. This is the other part where having the peppers halved would have made it easier.
I used a butter knife to pack the whole peppers and then I pulled out some of our bread crumbs from the freezer and coated the cheese mix.
Now comes some of the guess work.
I put them into a small baking dish and as one set of directions I glanced at said "put a single layer". Really I didn't need that part spelled out, but there you have it.


Now comes the baking part, I baked at 350 Deg. for 20 to 30 mins until the bread crumbs start to brown and the cheese is melting. This is how they looked when they came out of the oven. OH yeah I do not know if this will make a difference or not but I did put them in the frigs for about an hour before cooking. I did this so I could have them ready when Erin got home. We of course had to use a bit of ranch to eat them with but they were great. This is what they looked like when we got done with them.

Friday, May 13, 2011

Jam Making Class

     Wow what a great crazy night!  Last night Photo Dude and I taught our first Jam Making class for our local Community Education department.  The room we used was hot!  Felt just like canning in July for sure.  We made a strawberry-honey jam and while that was in the canner I showed them how quick you can whip up a batch of freezer jam.  Strawberry jam is probably my favorite and isn't that color just so pretty!  The class was a lot of fun and I can't wait to do more canning classes again in the fall.
 P.S.  If you were in my class last night here is the recipe for the bread I made that I brought with me.


Monday, March 14, 2011

Bacon Pancakes

This is something that I tried at a restaurant years ago and loved.  Unfortunately that place burned down.  Here is my attempt at their recipe it is quite yummy.

Bacon Pancakes

2 C. Flour
2 Tbsp. Sugar
4 tsp. Baking Powder
1/2 tsp. Salt
2 Eggs
2 C. Milk (more for thinner pancakes)
1 tsp. Vanilla Extract
1 lb. Bacon cooked and crumbled
Mix all the dry ingredients in a large bowl.  Make a well in the center and mix your liquid ingredients.  Blend everything together.  Fold in the cooked bacon, add more milk if you like a thinner pancake.  Pour onto a hot griddle and cook.  Enjoy covered in real maple syrup!

Tuesday, March 1, 2011

The winter yuckies

We aren't quite over the winter illnesses here yet.  Jack has been sick a few times probably because it is his first year in all day school.  Molly hasn't been sick until this weekend.  She got that 24 hour stomach bug Saturday and it just knocked her out.  So a little chicken soup to help get her back on her feet is just the thing!  Make big ol' pot of this and freeze half for next time the yuckies strike your house and you don't feel up to cooking.

Feel Better Chicken Soup

Half a chicken (on the bones) cooked.  The bones are where all the good stuff is, cook it on the bones then pick it apart once it's cooked.
3 large carrots cut into chunks
3 stalks of celery cut into chunks also use the leafy tops that is going to add tons of flavor
1 small onion, cut finely (we don't like big chunks but if you do go for it)
1 C. corn
1/2 C. peas
handful of okra
1/2 a small can of diced tomatoes, drained
salt and pepper to taste
1/8-1/4 tsp chili paste, it adds a nice warmth to the soup without adding a lot of heat.  If you like the heat add more
2 TBSP. parsley, fresh if you have it
chicken broth

Place all your ingredients in a crock pot or large stock pot, cover with chicken broth or stock.  Let simmer for at least four hours to get the best flavor. 
The last thing to do it making noodles or rice to add to the bowls.  My mom never liked adding the noodles to the soup pot because she didn't like when they got mushy and the noodles don't always take to being reheated so we've always just don't our noodles on the side.

I hope that you enjoy this simple soup and it makes your sickies feel better.

Monday, February 28, 2011

National Pancake Week

Hey everyone are you ready for National Pancake Week?!  We love pancakes in our house and have them several times a month, sometimes even for dinner.  We are kicking off the week with a favorite recipe of my dear friend Lori's.  I had this for lunch at her place once and begged her to share with me.  I hope you guys enjoy it as much as I did.


German Apple Pancake
4 eggs
1/2 c. all purpose flour
1/2 tsp baking powder
1 T sugar
1 pinch of salt
1 c milk
1 tsp vanilla (or more if you like it)
2 T unsalted butter melted
1/2 tsp ground nutmeg
I also add 1 T of cinnamon if I'm using the apple pie filling in a can if you don't you will need
1/4 c unsalted butter
1/2 c sugar
1/2 tsp cinnamon
1/2 tsp nutmeg
1 large tart apple peeled cored and sliced
In a large bowl blend eggs, flour, baking powder, sugar and salt. Add milk slowly add vanilla, butter, and spices. Let stand for at least 30 min to overnight.
Preheat oven to 425
if using fresh apple: Melt butter in 10" oven proof skillet brushing it up the sides. In a small bowl combine 1/4 sugar and the spices and sprinkle mixture over the butter and line the pan with the apple slices. Sprinkle remaining sugar over the slices. Place pan over medium high heat until the mixture bubbles then gently pour the batter over the apples.
if using canned apples just pour batter into pan and spoon the apples through out without mixing them together. (think drop biscuits)
Here the recipe lies!!! Bake in over for 15 minutes (more like 40) till the batter puffs up over the edges of pan. Reduce heat to 375 and bake for 10 min (another lie more like 30) till golden brown and not doughy (finger test the middle without pushing it in just tap and see if the pancake bounces like a cake)
Just a reminder hot apples will burn your mouth so let it cool before eating :)

Tuesday, January 25, 2011

Cleaning Cast Iron

I love Photo Dude super awesome lots do I love that man but when he leaves me a mess like this it makes me wonder about him.  He was sweet enough to cook up the bacon for dinner the other night (BLTs yummy!) and then I had this pan to clean, my brand new cast iron skillet.  If you are like me and looking at it going "Oh crap now what do I do!" here's whatcha' do.

Scrape all the crud out of it, next time I'll do it when it's still hot instead of waiting..... ummm a while before doing it.

Sprinkle some salt over the whole pan, just regular out of the cheap cylinder salt.
Now start scrubbing the yuck out.  We started with paper towels then got ourselves an old dish cloth that will now only be used for this skillet.  My super sweet awesome step-dad helped with this project and provided much elbow grease.  If you are scrubbing your pan and the salt isn't soaking up the grease any more, dump out the salt and add more in.  We had to change our salt out once.
This is what it looked like when we were all done scrubbing.  Then we washed it out with soap and water (please don't stone me for this).  Just a quick wash around the inside to get all the left over salt and whatnot out okay?
Next put that sucker in your oven.  Our oven was hot from baking so we didn't actually turn it on we just let the heat dry it out for about a half hour or so.
This is what it looked like out of the hot oven.

Last take a lightly oiled cloth and swipe it around in the pan to keep it from rusting.  We used probably less than a teaspoon of vegetable oil.  If you use too much oil it can get rancid in your pans and that would just be nasty.
If you keep your cast iron in good condition they will last you forever and the more you use it the better they get.  Happy scrubbing!